26 Jan 2026
 Planet Lisp
TurtleWare: McCLIM and 7GUIs - Part 1: The Counter
Table of Contents
For the last two months I've been polishing the upcoming release of McCLIM. The most notable change is the rewriting of the input editing and accepting-values abstractions. As it happens, I got tired of it, so as a breather I've decided to tackle something I had in mind for some time to improve the McCLIM manual - namely the 7GUIs: A GUI Programming Benchmark.
This challenge presents seven distinct tasks commonly found in graphical interface requirements. In this post I'll address the first challenge - The Counter. It is a fairly easy task, a warm-up of sorts. The description states:
Challenge: Understanding the basic ideas of a language/toolkit.
The task is to build a frame containing a label or read-only textfield T and a button B. Initially, the value in T is "0" and each click of B increases the value in T by one.
Counter serves as a gentle introduction to the basics of the language, paradigm and toolkit for one of the simplest GUI applications imaginable. Thus, Counter reveals the required scaffolding and how the very basic features work together to build a GUI application. A good solution will have almost no scaffolding.
In this first post, to make things more interesting, I'll solve it in two ways:
- using contemporary abstractions like layouts and gadgets
- using CLIM-specific abstractions like presentations and translators
In CLIM it is possible to mix both paradigms for defining graphical interfaces. Layouts and gadgets are predefined components that are easy to use, while using application streams enables a high degree of flexibility and composability.
First, we define a package shared by both versions:
(eval-when (:compile-toplevel :load-toplevel :execute)
  (unless (member :mcclim *features*)
    (ql:quickload "mcclim")))

(defpackage "EU.TURTLEWARE.7GUIS/TASK1"
  (:use  "CLIM-LISP" "CLIM" "CLIM-EXTENSIONS")
  (:export "COUNTER-V1" "COUNTER-V2"))
(in-package "EU.TURTLEWARE.7GUIS/TASK1")
Note that "CLIM-EXTENSIONS" package is McCLIM-specific.
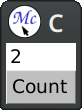
Version 1: Using Gadgets and Layouts
Assuming that we are interested only in the functionality and we are willing to ignore the visual aspect of the program, the definition will look like this:
(define-application-frame counter-v1 ()
  ((value :initform 0 :accessor value))
  (:panes
   ;;      v type v initarg
   (tfield :label :label (princ-to-string (value *application-frame*))
                  :background +white+)
   (button :push-button :label "Count"
                        :activate-callback (lambda (gadget)
                                             (declare (ignore gadget))
                                             (with-application-frame (frame)
                                               (incf (value frame))
                                               (setf (label-pane-label (find-pane-named frame 'tfield))
                                                     (princ-to-string (value frame)))))))
  (:layouts (default (vertically () tfield button))))

;;; Start the application (if not already running).
;; (find-application-frame 'counter-v1)
The macro define-application-frame is like defclass with additional clauses. In our program we store the current value as a slot with an accessor.
The clause :panes is responsible for defining named panes (sub-windows). The first element is the pane name, then we specify its type, and finally we specify initargs for it. Panes are created in a dynamic context where the application frame is already bound to *application-frame*, so we can use it there.
The clause :layouts allows us to arrange panes on the screen. There may be multiple layouts that can be changed at runtime, but we define only one. The macro vertically creates another (anonymous) pane that arranges one gadget below another.
Gadgets in CLIM operate directly on top of the event loop. When the pointer button is pressed, it is handled by activating the callback, that updates the frame's value and the label. Effects are visible immediately.
Now if we want the demo to look nicer, all we need to do is to fiddle a bit with spacing and bordering in the :layouts section:
(define-application-frame counter-v1 ()
  ((value :initform 0 :accessor value))
  (:panes
   (tfield :label :label (princ-to-string (value *application-frame*))
                  :background +white+)
   (button :push-button :label "Count"
                        :activate-callback (lambda (gadget)
                                             (declare (ignore gadget))
                                             (with-application-frame (frame)
                                               (incf (value frame))
                                               (setf (label-pane-label (find-pane-named frame 'tfield))
                                                     (princ-to-string (value frame)))))))
  (:layouts (default
             (spacing (:thickness 10)
              (horizontally ()
                (100
                 (bordering (:thickness 1 :background +black+)
                   (spacing (:thickness 4 :background +white+) tfield)))
                (15 (make-pane :label))
                (100 button))))))

;;; Start the application (if not already running).
;; (find-application-frame 'counter-v1)

This gives us a layout that is roughly similar to the example presented on the 7GUIs page.
Version 2: Using the CLIM Command Loop
Unlike gadgets, stream panes in CLIM operate on top of the command loop. A single command may span multiple events after which we redisplay the stream to reflect the new state of the model. This is closer to the interaction type found in the command line interfaces:
  (define-application-frame counter-v2 ()
    ((value :initform 0 :accessor value))
    (:pane :application
     :display-function (lambda (frame stream)
                         (format stream "~d" (value frame)))))

  (define-counter-v2-command (com-incf-value :name "Count" :menu t)
      ()
    (with-application-frame (frame)
      (incf (value frame))))

;; (find-application-frame 'counter-v2)
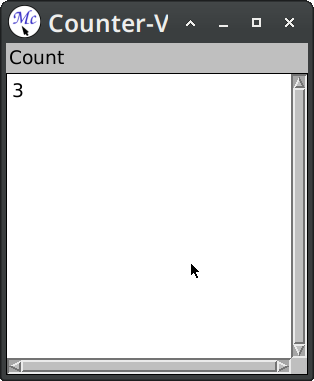
Here we've used :pane option this is a syntactic sugar for when we have only one named pane. Skipping :layouts clause means that named panes will be stacked vertically one below another.
Defining the application frame defines a command-defining macro. When we define a command with define-counter-v2-command, then this command will be inserted into a command table associated with the frame. Passing the option :menu t causes the command to be available in the frame menu as a top-level entry.
After the command is executed (in this case it modifies the counter value), the application pane is redisplayed; that is a display function is called, and its output is captured. In more demanding scenarios it is possible to refine both the time of redisplay and the scope of changes.
Now we want the demo to look nicer and to have a button counterpart placed beside the counter value, to resemble the example more:
(define-presentation-type counter-button ())

(define-application-frame counter-v2 ()
  ((value :initform 0 :accessor value))
  (:menu-bar nil)
  (:pane :application
   :width 250 :height 32
   :borders nil :scroll-bars nil
   :end-of-line-action :allow
   :display-function (lambda (frame stream)
                       (formatting-item-list (stream :n-columns 2)
                         (formatting-cell (stream :min-width 100 :min-height 32)
                           (format stream "~d" (value frame)))
                         (formatting-cell (stream :min-width 100 :min-height 32)
                           (with-output-as-presentation (stream nil 'counter-button :single-box t)
                             (surrounding-output-with-border (stream :padding-x 20 :padding-y 0
                                                                     :filled t :ink +light-grey+)
                               (format stream "Count"))))))))

(define-counter-v2-command (com-incf-value :name "Count" :menu t)
    ()
  (with-application-frame (frame)
    (incf (value frame))))

(define-presentation-to-command-translator act-incf-value
    (counter-button com-incf-value counter-v2)
    (object)
  `())

;; (find-application-frame 'counter-v2)
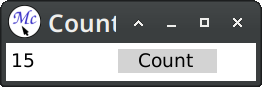
The main addition is the definition of a new presentation type counter-button. This faux button is printed inside a cell and surrounded with a background. Later we define a translator that converts clicks on the counter button to the com-incf-value command. The translator body returns arguments for the command.
Presenting an object on the stream associates a semantic meaning with the output. We can now extend the application with new gestures (names :scroll-up and :scroll-down are McCLIM-specific):
(define-counter-v2-command (com-scroll-value :name "Increment")
    ((count 'integer))
  (with-application-frame (frame)
    (if (plusp count)
        (incf (value frame) count)
        (decf (value frame) (- count)))))

(define-presentation-to-command-translator act-scroll-up-value
    (counter-button com-scroll-value counter-v2 :gesture :scroll-up)
    (object)
  `(10))

(define-presentation-to-command-translator act-scroll-dn-value
    (counter-button com-scroll-value counter-v2 :gesture :scroll-down)
    (object)
  `(-10))

(define-presentation-action act-popup-value
    (counter-button nil counter-v2 :gesture :describe)
    (object frame)
  (notify-user frame (format nil "Current value: ~a" (value frame))))
A difference between presentation to command translators and presentation actions is that the latter does not automatically progress the command loop. Actions are often used for side effects, help, inspection etc.
Conclusion
In this short post we've solved the first task from the 7GUIs challenge. We've used two techniques available in CLIM - using layouts and gadgets, and using display and command tables. Both techniques can be combined, but differences are visible at a glance:
- gadgets provide easy and reusable components for rudimentary interactions
- streams provide extensible and reusable abstractions for semantic interactions
This post only scratched the capabilities of the latter, but the second version demonstrates why the command loop and presentations scale better than gadget-only solutions.
Following tasks have gradually increasing level of difficulty that will help us to emphasize how useful are presentations and commands when we want to write maintainable applications with reusable user-defined graphical metaphors.
26 Jan 2026 12:00am GMT
20 Jan 2026
Planet Lisp
Joe Marshall: Filter
One of the core ideas in functional programming is to filter a set of items by some criterion. It may be somewhat suprising to learn that lisp does not have a built-in function named "filter" "select", or "keep" that performs this operation. Instead, Common Lisp provides the "remove", "remove-if", and "remove-if-not" functions, which perform the complementary operation of removing items that satisfy or do not satisfy a given predicate.
The remove function, like similar sequence functions, takes an optional keyword :test-not argument that can be used to specify a test that must fail for an item to be considered for removal. Thus if you invert your logic for inclusion, you can use the remove function as a "filter" by specifying the predicate with :test-not.
> (defvar *nums* (map 'list (λ (n) (format nil "~r" n)) (iota 10)))
*NUMS*

;; Keep *nums* with four letters
> (remove 4 *nums* :key #'length :test-not #'=)
("zero" "four" "five" "nine")

;; Keep *nums* starting with the letter "t"
> (remove #\t *nums* :key (partial-apply-right #'elt 0) :test-not #'eql)
("two" "three")
20 Jan 2026 11:46am GMT
16 Jan 2026
Planet Lisp
Scott L. Burson: FSet v2.2.0: JSON parsing/printing using Jzon
FSet v2.2.0, which is the version included in the recent Quicklisp release, has a new Quicklisp-loadable system, FSet/Jzon. It extends the Jzon JSON parser/printer to construct FSet collections when reading, and to be able to print them.
On parsing, JSON arrays produce FSet seqs; JSON objects produce FSet replay maps by default, but the parser can also be configured to produce ordinary maps or FSet tuples. For printing, any of these can be handled, as well as the standard Jzon types. The tuple representation provides a way to control the printing of `nil`, depending on the type of the corresponding key.
For details, see the GitLab MR.
NOTE: unfortunately, the v2.1.0 release had some bugs in the new seq code, and I didn't notice them until after v2.2.0 was in Quicklisp. If you're using seqs, I strongly recommend you pick up v2.2.2 or newer from GitLab or GitHub.
16 Jan 2026 8:05am GMT