09 Jun 2026
 TalkAndroid
This must-watch thriller is taking Netflix by storm—fans are obsessed and Season 2 just dropped
Scandinavian thrillers have been making waves on Netflix, and one series in particular has left viewers captivated-Season 2…
09 Jun 2026 3:30pm GMT
The strict casting rule that kept Robin Williams out of Harry Potter—here’s why he was rejected
Before HBO's new Harry Potter series stirred up a fresh round of casting speculation, there were already intriguing…
09 Jun 2026 3:00pm GMT
Is Off Campus the Next Romance Hit You Can’t Miss—or Just Another Summer Fling?
If summer romances are your guilty pleasure and you can't resist a new streaming trend, you might be…
09 Jun 2026 6:30am GMT
08 Jun 2026
Android Developers Blog
Datadog delivers millions of in-depth performance insights with ProfilingManager

Posted by Alice Yuan, Developer Relations Engineer at Google, Arti Arutiunov, Product Manager at Datadog and Nikita Ogorodnikov, Staff Software Engineer at Datadog

Performance regressions are notoriously hard to reproduce, making regressions a massive bottleneck for mobile developers. Although signals like ANR rates indicate what issues occur in production, pinpointing the specific line of code that resulted in the performance issue has historically necessitated exhaustive manual reproduction or speculative trial-and-error experimentation.
Datadog collaborated with Google to mitigate this frustration by integrating the ProfilingManager API (available on Android 15+ devices) into its Real User Monitoring (RUM) and Continuous Profiling platforms. This integration transforms the debugging workflow, allowing developers to move beyond surface-level symptoms to being able to detect the why behind a performance bottleneck.
By leveraging this system-level API, Datadog now processes millions of production profiles weekly across the globe according to Datadog internal data of June 2026. It provides engineering teams with a new level of visibility into real-world performance, all while maintaining a low runtime overhead for production-scale performance monitoring.
The impact of ProfilingManager
ProfilingManager is a system service introduced in Android 15 that enables apps to programmatically collect performance data such as call stack samples, field traces and memory heap dumps directly from production environments. This capability shifts the engineering paradigm from reactive manual reproduction to proactive field analysis.

For example, a Google communications app used field traces to investigate why its cold start times were slower on newer, more powerful hardware. By diving into the field-collected traces and comparing traces across different device types, the engineer discovered a hidden scheduling issue: a background text-to-speech service was unnecessarily being prewarmed during app startup. The traces revealed that this background process was monopolizing the device's highest-performing big CPU core, forcing the app's main thread to sleep while the prewarm occurred.
Solving the Android code-level visibility challenge
Prior to the implementation of ProfilingManager, Datadog's Real User Monitoring (RUM) focused on high-level application health and session-level telemetry to assess the user journey. Engineering teams could monitor Android performance signals like time to initial display, ANR rates, CPU load, and frozen frames. These insights extended to granular interactions, such as network latency, touch events, and main thread hangs. However, while this data effectively highlighted which performance bottlenecks were surfacing in the field, it provided no clear path to identifying the root cause of these failures.

To address this, Datadog needed a profiling engine capable of capturing Android traces directly from devices in production with minimal performance impact. After evaluating alternative approaches, such as writing their own trace processor using Android Debug APIs, the team selected ProfilingManager because it is the most performant solution of the profiling options they evaluated and offloads the sampling decisions overhead to the OS.
ProfilingManager supports a wide range of collection methods, including CPU traces, call stack sampling, memory analysis through Java heap dumps and native heap profiles. It enables developers to profile production builds, upload trace files to external storage, and review them in the Perfetto trace analyzer UI. As a SaaS provider, Datadog uploads, visualizes, and analyzes these profiles collected via its SDK, providing a unified view of application health.
By centralizing high-fidelity telemetry within a unified observability API, ProfilingManager empowers Datadog and its clients to proactively monitor, investigate, and remediate complex Android performance regressions through key technical advantages:
- Granular session diagnostics: ProfilingManager enhances debuggability by delivering direct OS-level trace data, overcoming the visibility and alignment challenges typical of custom logging with system services. To dive deeper, developers can download these traces from Datadog to investigate further in visualization tools like the Perfetto UI.
- Automated telemetry triggers: By leveraging native system events to initiate trace recordings at key optimization points, Datadog reduces the need to build custom collection logic. While the initial rollout focuses on the APP_FULLY_DRAWN signal, there are already plans to expand this observability to include ANR, OOM, and COLD_START triggers.
- Proactive trace snapshots: By interfacing directly with the system-level Perfetto service (traced), ProfilingManager utilizes a proactive background recording model designed to capture unpredictable issues. This ensures that developers receive a precise visualization of the events leading up to a performance anomaly, offering a level of insight that exceeds what is possible through manual instrumentation.
- Bottleneck detection at scale: Datadog is able to synthesize telemetry from across Datadog's global customer base to uncover regressions that only emerge under unique hardware configurations and variable network environments.
- System-enforced resource stability: The API leverages sampling trace collection to ensure performance and user experience impacts remain unnoticeable.
- On-device data controls: ProfilingManager filters out irrelevant information from other processes on-device before the profile is delivered to the app. This minimizes file sizes and ensures that only data relevant to the app's processes is provided.
Processing millions of weekly profiles to optimize real-world apps

Integrating a system-level profiling API into a global monitoring SDK required solving infrastructure challenges. Because ProfilingManager generates highly detailed performance traces, the Datadog engineering team had to build a pipeline capable of parsing and analyzing these profiles on the server side at scale. Beyond profile collection, Datadog also emphasizes the importance of balancing sampling frequency with collecting enough data to generate meaningful insights about your application. Datadog relies on ProfilingManager's built-in rate limiting as a critical stability safeguard, preventing excessive telemetry requests from overburdening user devices.
The team has been profiling Datadog's own native Android application and a number of early adopters' applications for months, gathering millions of profiles to ensure a fast, error-free launch experience and to refine their performance-detection algorithms. Today, the production integration seamlessly scales across a variety of Android devices.
Conclusion
By integrating Android's ProfilingManager API, Datadog successfully closed the visibility gap between backend systems and mobile client applications for their customers. By processing millions of profiles weekly with negligible device overhead, Datadog equips Android developers with the code-level insights necessary to diagnose complex performance bugs instantly, helping developers build smoother applications and improve their app's performance signals in the Play Store. To adopt the ProfilingManager API directly into your performance observability framework, check out our documentation.
In the future, Datadog aims to make Android profiling data a first-class input for coding agents to autonomously resolve performance bottlenecks, closing the feedback loop between detection and remediation. Datadog is working toward making Android profiling broadly accessible to developers.
To get started using the Datadog real user monitoring feature powered by ProfilingManager, visit Datadog Mobile Real User Monitoring.
08 Jun 2026 1:00pm GMT
02 Jun 2026
Android Developers Blog
Prioritizing Memory Efficiency: Essential Steps for Android 17


While app performance is often equated with a smooth UI and fast start times, memory serves as the silent foundation upon which these visible metrics are built. It's no secret that we're seeing a shift where device memory is more important than ever. Not only have we made strides in Android memory optimizations with Android 17, we're providing the tooling and API support to help you stay ahead of stricter memory requirements later this year.
To ensure device stability, starting in Android 17, the system will begin enforcing app memory limits based on the device's total RAM. If an app exceeds those limits, Android will kill the process with no associated stack trace.
To build highly performant apps and avoid these forced terminations, we recommend that you adopt the following memory optimization strategies:
Understanding Android 17 app memory limits
App memory limits are being introduced in Android 17 to prevent "one bad actor" from destroying the multitasking experience and stability of the user's entire device.
Here is a breakdown of the reasons driving this architectural change:
- Preventing cascading kills: When an app becomes bloated or leaks memory while holding a privileged state (e.g. it's running a Foreground Service), it is initially shielded from the system's Low Memory Killer (LMK). As this single app grows unchecked and hoards RAM, the LMK is forced to compensate by killing off dozens of smaller, well-behaved cached apps and background jobs to reclaim space for the memory hog.
- Preserving multitasking and user state: When the system is forced to purge cached apps to accommodate a single leaking process, the multitasking experience is severely degraded. Users returning to prior cached applications encounter sluggish cold starts instead of near-instant warm resumes. This inefficiency generates more CPU strain and accelerates battery depletion. It can also destroy the user's context in recently used apps, such as scroll positions, navigation stacks, and in-game progress.
To determine if your app session was impacted by these constraints in the field, you can call getDescription() within ApplicationExitInfo. If the system applied a limit, the exit reason is reported as REASON_OTHER and the description string will contain "MemoryLimiter:AnonSwap". You can also leverage trigger-based profiling using TRIGGER_TYPE_ANOMALY to automatically capture heap dumps when the memory limit is reached. Furthermore, Android is actively working to surface more in-field memory metrics to developers within the Google Play Console.
We have also expanded our memory limits documentation to include local debugging commands, allowing you to simulate memory constraints in your local environment and validate your application's behavior under any memory limit enforcement.
Maximize bytecode optimization with R8
A highly effective way to reduce your app's memory footprint is to enable the R8 optimizer. By shrinking classes, methods, and fields into shorter names and stripping out unused code and resources, R8 significantly reduces your app's memory footprint by minimizing the amount of resident code required during execution.
R8 minimizes resident code, shrinking the memory footprint and lowering LMK termination risk. This results in more frequent warm starts over slow cold starts. Additionally, streamlined bytecode reduces main-thread CPU overhead, directly cutting ANR rates for a more fluid user experience. For example, the digital bank Monzo enabled full R8 optimization and saw a 35% reduction in their ANR rate, a 30% improvement in cold start rate, and a 9% reduction in overall app size.

To properly configure R8 in your build.gradle file:
- Set
isShrinkResources = trueandisMinifyEnabled = true. - Use
proguard-android-optimize.txtinstead of the legacyproguard-android.txt, which actually prevents optimizations and is no longer supported in Android Gradle Plugin 9. - Remove
android.enableR8.fullMode = falsefrom yourgradle.properties.
If you are using reflection in your code base, then add Keep rules to prevent R8 from optimizing those parts of the code. Make sure to scope the keep rules narrowly to get the maximum optimization.
To get the maximum optimization, make sure to follow these best practices in your keep rule file.
- Remove global options like
-dontoptimize,-dontshrink, and-dontobfuscatethat prevent R8 from optimizing the entire codebase - Remove keep rules that prevent optimizing Android components like Activity, Services, Views or Broadcast receivers.
- Refine the broad package wide keep rules to target only specific classes or methods.
To see more best practices, view our keep rules documentation.
Library Developer R8 Best Practices
If you are a library developer, strictly place the rules your consumers need into your consumer-rules file, and keep your library's internal protection rules in your proguard-rules.pro file. For more information on how to optimize libraries, see Optimization for library authors.
R8 Configuration Analyzer
To audit your R8 optimization, use the Configuration Analyzer. Configuration analyzer shows the current state of optimization with Obfuscation, Optimization, and Shrinking scores. With configuration analyzer, you can also understand how many classes, methods or fields are prevented from optimization by each keep rule. Refine these broad package wide keep rules to unlock the maximum optimization.
Using configuration analyzer, you can also identify keep rules that are subsuming other keep rules, redundant keep rules and unused keep rules.

R8 Agent Skill
You can also leverage the R8 Agent Skill with Android Studio agent or other AI tools to resolve misconfigurations and refine your rules resulting in improved app performance. (Insights from AI-driven skills will require technical verification)
Optimize image loading
Bitmaps are usually the largest common objects residing in your app's memory. They represent the final stage of the image loading process where compressed files, like JPEGs or PNGs, are decoded into raw pixel data for display. This means a tiny 100KB compressed image can balloon into several megabytes of RAM because memory consumption is determined by the image's pixel dimensions and color depth. Since bitmap operations are frequently on the critical path to drawing frames, unoptimized images cause severe memory bloat and UI jank.
Google recommends leveraging image loading libraries Coil for Kotlin-first projects, particularly when developing with Jetpack Compose and Glide for Java-based applications.
Adopt these five best practices
- Downsample images: If you're loading bitmaps manually, avoid loading a massive image into a tiny thumbnail view; use inSampleSize to load a smaller version. Glide and Coil downsamples images by default and you can configure this downsample strategy using DownsampleStrategy and ImageLoader respectively.
- Cropping: Avoid embedding padding directly into an image file for letterboxing purposes (e.g., creating a transparent border to expand an image dimensions). Rather than baking in these borders, utilize InsetDrawable or apply padding directly within the View or Composable containing the bitmap.
- Config: Balance memory and quality by choosing the right pixel format. Use
RGB_565when transparency isn't needed, which uses half the memory of the defaultARGB_8888format. In Glide you can configure this by using DecodeFormat and in Coil you can use bitmapConfig property. - Prioritize vector drawables: For basic geometric assets, leverage ShapeDrawable as a lightweight alternative to decoding rasterized bitmaps. By defining these assets once via XML, you ensure they scale seamlessly across all display densities while effectively eliminating resource-driven memory bloat.
- Reuse: If your application manages Bitmaps manually then to minimize memory churn, when a bitmap is no longer required, the app should call
bitmap.recycle()and immediately discard the Bitmap reference. If you use an image loading library like Glide or Coil, return the bitmap to the library's managed pool. By providing an existing buffer for future memory needs, the pool effectively avoids the overhead of new allocations.
Check out our documentation on Optimizing performance for images to learn more.
Android Studio tooling
You can also eliminate redundant bitmaps using Android Studio Narwhal 4. Here is how to hunt them down in five simple steps:
- Open the Profiler tab in Android Studio
- Click Heap Dump (or "Analyze Memory Usage") and hit record to take a snapshot of your app's current memory state.
- Scan the analysis results for the yellow warning triangle ⚠️, which Android Studio uses to flag duplicate bitmaps being stored multiple times. Alternatively, navigate to the profiler header, choose "Filter by:" and pick the "Duplicate Bitmaps" setting.
- Click on any flagged entry to open the Bitmap Preview pane, allowing you to see exactly which image is the repeat offender.
- Use that visual confirmation to track down the redundant loading logic in your code and implement a better caching strategy.

Detect and fix memory leaks with Android Studio
Memory leaks in Android occur when your code holds onto an object's reference long after its lifecycle has ended. This prevents the Garbage Collector (GC) from reclaiming that memory, eventually leading to sluggish performance or OutOfMemoryError (OOM).
Android Studio Panda 3 features a dedicated LeakCanary profiler task, allowing developers to analyze real-time memory leaks and map traces within the IDE.
The LeakCanary profiler task in Android Studio actively moves the memory leak analysis from your device to your development machine, resulting in a significant performance boost during the leak analysis phase as compared to on-device leak analysis.

Additionally, the leak analysis is now contextualized within the IDE and fully integrated with your source code, providing features like go to declaration and other helpful code connections that drastically reduce the friction and time required to investigate and fix memory leaks.
Examples of common memory leaks
Memory leaks occur when an object persists in memory beyond its intended lifespan. This typically happens due to:
- Retaining references to Fragments, Activities, or Views that are no longer in use.
- Mismanaging Context references.
- Failing to properly unregister observers, listeners, and receivers.
- Creating static references to objects that are bound to components with shorter lifecycles.
Here are a few example scenarios:
|
Scenario |
Compose-based example |
View-based example |
|
Leaking Context |
Example: Fix: |
Example: Fix: |
|
Leaking Listeners |
Example: Fix: |
Example: Fix: |
|
Leaking Views |
Example: Fix: |
Example: Fix: |
Trim memory when app leaves visible state
Android can reclaim memory from your app or stop your app entirely if necessary to free up memory for critical tasks, as explained in Overview of memory management. Android will usually reclaim memory from your app when it's not visible to the user, such as by discarding some of your app's code and data pages in memory or compressing your heap allocations. When the user resumes your app and your app tries to access some memory that's been reclaimed, the OS will swap that memory back in on demand. This swapping behavior can be slow, and cause unexpected jank or stutters in your app.
If you leave it to the OS to decide what memory to reclaim from your app, you may find that the OS reclaimed memory that you'll need shortly after resuming your app. Instead, your app can voluntarily discard memory allocations that it can regenerate later, on demand and at a low cost. To do so, you can implement the ComponentCallbacks2 interface. You can implement onTrimMemory in your Activity, Fragment, Service, or even your custom Application class. Using it in the Application class is highly effective for global cache management.
The provided onTrimMemory() callback method notifies your app of lifecycle or memory-related events that present a good opportunity for your app to voluntarily reduce its memory usage.
In terms of memory lifecycle management, your implementation should focus exclusively on TRIM_MEMORY_UI_HIDDEN and TRIM_MEMORY_BACKGROUND. Since Android 14, the system has ceased delivering notifications for other legacy constants, which were formally deprecated in Android 15.
TRIM_MEMORY_UI_HIDDEN: This signal indicates that your application's UI has transitioned out of the user's view. This provides an opportunity to release substantial memory allocations tied strictly to the interface-such as Bitmaps, video playback buffers, or complex animation resources.
TRIM_MEMORY_BACKGROUND: At this level, your process is residing in the background and is now a candidate for termination to satisfy the system's global memory needs. To extend the duration your process remains in the cached state, and reduce the number of app cold starts, you should aggressively release any resources that can be easily reconstructed once the user resumes their session.
import android.content.ComponentCallbacks2
// Other import statements.

class MainActivity : AppCompatActivity(), ComponentCallbacks2 {

    /**
     * Release memory when the UI becomes hidden or when system resources become low.
     * @param level the memory-related event that is raised.
     */
    override fun onTrimMemory(level: Int) {

        if (level >= ComponentCallbacks2.TRIM_MEMORY_UI_HIDDEN) {
            // Release memory related to UI elements, such as bitmap caches.
        }

        if (level >= ComponentCallbacks2.TRIM_MEMORY_BACKGROUND) {
            // Release memory related to background processing, such as by
            // closing a database connection.
        }
    }
}
Note: The onTrimMemory integration may depend on SDK support. For instance, certain games rely on their game engine to enable this capability. Please check out the game memory optimization documents.
Advanced memory observability with ProfilingManager
To catch and diagnose memory issues in the field that cannot be reproduced locally, you should leverage the ProfilingManager API. Introduced in Android 15, this advanced observability API allows you to programmatically collect real-user Perfetto profiles.
For teams that lack a dedicated infrastructure to manage and host performance artifacts, Crashlytics is exploring a specialized solution to streamline this workflow. They are inviting developers to provide feedback.
Android 17 introduces new event-driven triggers, most notably TRIGGER_TYPE_OOM and TRIGGER_TYPE_ANOMALY:
- The OOM trigger automatically collects a Java heap dump at the exact moment an OutOfMemoryError crash occurs, providing precise allocation states. A collected OOM profile is provided the next time the app starts and registers the
registerForAllProfilingResultscallback. - The Anomaly trigger detects severe performance issues, such as excessive binder spam or breached memory thresholds. The memory anomaly delivers a heap dump just prior to the system terminating the app.
  val profilingManager =
applicationContext.getSystemService(ProfilingManager::class.java)
    val triggers = ArrayList()


    triggers.add(ProfilingTrigger.Builder(
                 ProfilingTrigger.TRIGGER_TYPE_ANOMALY))
    val mainExecutor: Executor = Executors.newSingleThreadExecutor()
    val resultCallback = Consumer { profilingResult ->
        if (profilingResult.errorCode != ProfilingResult.ERROR_NONE) {
            // upload profile result to server for further analysis
            setupProfileUploadWorker(profilingResult.resultFilePath)
        }

    profilingManager.registerForAllProfilingResults(mainExecutor, resultCallback)
    profilingManager.addProfilingTriggers(triggers)
Once you've collected the heap dump, you can download the profile from the server, or locally via adb pull and drag and drop the file into the Perfetto UI. To streamline your memory debugging workflow, use the Heap Dump Explorer, this is the new default view for heap dumps in Perfetto UI. This tool provides an intuitive interface for inspecting Java heap dumps, allowing you to visualize object allocation hierarchies, compute retained memory sizes, and identify the shortest path from garbage collection root. By leveraging the Heap Dump Explorer, you can rapidly pinpoint memory leaks, bloated retained objects such as excessive bitmap allocations, and analyze heap object allocations all in one place.

Conclusion
Optimizing bytecode with R8, adopting image loading best practices, and resolving memory leaks are critical steps toward delivering a high-quality user experience while managing resources effectively under pressure. Adopting these proactive measures helps maintain app stability and performance, preventing unexpected terminations while safeguarding user context. To further your performance expertise, explore our revised memory guidance.
02 Jun 2026 7:00pm GMT
Building Premium Android Experiences at Google I/O ‘26

.png)
To help you build apps that stand out, we're diving into the key tools and libraries designed to optimize your core performance, extend the surfaces of your app to other devices, and streamline how your app handles high-quality media.
Here is a recap of the essential updates and sessions you need to know to deliver a next-level experience across form factors!
Maximize app performance and ROI with the R8 Configuration Analyzer
A premium experience is only as good as its foundation, and a performant foundation is what allows your app to scale across the Android ecosystem. This is especially true with the release of Android 17, which introduces conservative, device RAM-based app memory limits to target extreme memory leaks and outliers before they cause system-wide instability. To stay below these new system thresholds and prevent your app from being terminated, having a lean footprint is no longer optional: it's a critical requirement.
This year, we're making it easier to build highly optimized, fast apps by introducing the R8 Configuration Analyzer in Android Studio. R8 is your most powerful tool for improving app performance, but its effectiveness is often limited by overly broad "keep rules" that prevent the compiler from stripping away unused code. The new Configuration Analyzer provides optimization, obfuscation, and shrinking scores, allowing you to identify specific rules that are preventing the benefits of R8 optimization.
By optimizing their R8 configurations, developers at Monzo achieved a 30% improvement in cold starts and a 35% reduction in ANRs. Smaller, faster code isn't just about efficiency; it's about ensuring your app has the memory headroom to deliver delight on every form factor, from the phone to the car.
Extend your reach with a unified approach to Widgets on Phones, Watches and Cars
User interaction is shifting toward quick, glanceable moments-short bursts of information that keep users connected without needing to open the full app. To help you increase the reach of your app content, we are unifying the development experience across the Android ecosystem with Jetpack Glance. By using a consistent, Compose-based model, you can elevate the content most important to your users straight to the phone's home screen, Wear Widgets (previously Tiles!), and cars with a familiar workflow.
In order to help users engage with your content and features, even outside your app, we are making widgets more expressive and adaptive with RemoteCompose. On Wear OS, RemoteCompose allows you to use the Compose tools you're already comfortable with to define UI logic that renders natively on remote surfaces, ensuring that your glanceable experiences remain highly performant and responsive even on resource-constrained hardware. On mobile and cars, RemoteCompose is used as a new framework giving Widgets new expressive capabilities.
You can use Jetpack Glance (together with RemoteCompose on Wear) to deliver a cohesive user journey. Whether it's viewing flight status on the car dashboard, checking a gate change on a watch, or managing a boarding pass from a phone widget, this shared approach maximizes your app's presence while keeping your development effort focused and efficient.
Supercharge your media pipeline with a complete, production-ready toolkit
It starts with high-fidelity capture using the CameraXViewfinder Composable, which ensures your preview remains perfectly scaled and responsive on any form factor, including foldables and tablets. Use this to build adaptive capture experiences like a picture-in-picture view for multi-tasking, or that take advantage of modern features like high-frame-rate or slow-motion capture with CameraX v1.5.
The new Media3 AI Effects library will provide a unified interface for premium features like Image & Video Enhance, Magic Eraser, and Studio Sound. This allows you to focus on the creative intent while Media3 handles the heavy lifting of choosing the most efficient and reliable path for the device. Then, use the latest improvements in multi-asset editing with Media3 Transformer to composite your edited videos together!
Complete the pipeline with tools designed for professional-grade export and viewing, including:
- CodecDB, which offers data-driven encoding recommendations tailored to specific chipsets, ensuring your exported videos maintain high visual quality with minimal noise or blurriness
- Scrubbing Mode in ExoPlayer to provide the buttery-smooth seeking experience users expect from premium media apps
- Enhanced Cast support with the new CastPlayer API in Media3
By unifying these technical pillars, you can build a cohesive, high-performance media journey that delivers both delight for your users and high ROI for your development team.
For more details, check out the premium Android experience YouTube playlist.
02 Jun 2026 5:00pm GMT
26 Jan 2026
Planet Maemo
Igalia Multimedia contributions in 2025
Now that 2025 is over, it's time to look back and feel proud of the path we've walked. Last year has been really exciting in terms of contributions to GStreamer and WebKit for the Igalia Multimedia team.
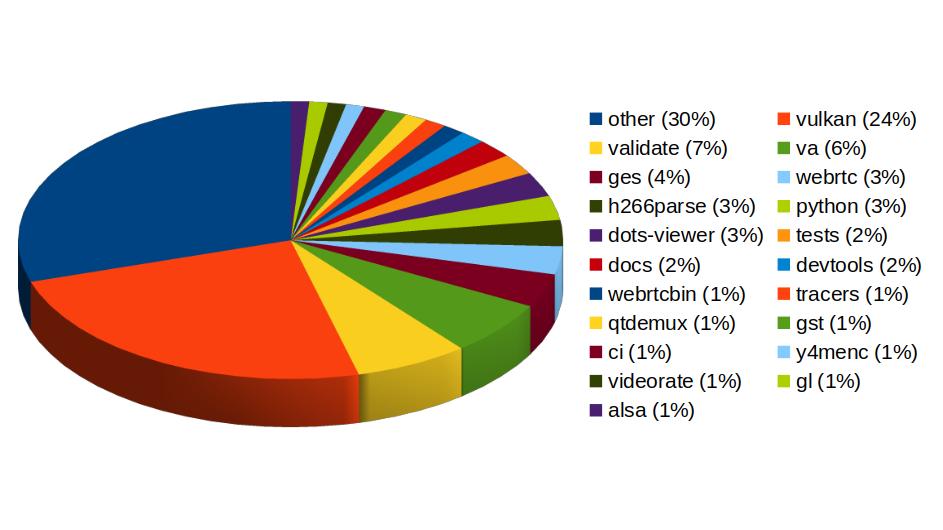
With more than 459 contributions along the year, we've been one of the top contributors to the GStreamer project, in areas like Vulkan Video, GstValidate, VA, GStreamer Editing Services, WebRTC or H.266 support.
In Vulkan Video we've worked on the VP9 video decoder, and cooperated with other contributors to push the AV1 decoder as well. There's now an H.264 base class for video encoding that is designed to support general hardware-accelerated processing.
GStreaming Editing Services, the framework to build video editing applications, has gained time remapping support, which now allows to include fast/slow motion effects in the videos. Video transformations (scaling, cropping, rounded corners, etc) are now hardware-accelerated thanks to the addition of new Skia-based GStreamer elements and integration with OpenGL. Buffer pool tuning and pipeline improvements have helped to optimize memory usage and performance, enabling the edition of 4K video at 60 frames per second. Much of this work to improve and ensure quality in GStreamer Editing Services has also brought improvements in the GstValidate testing framework, which will be useful for other parts of GStreamer.
Regarding H.266 (VVC), full playback support (with decoders such as vvdec and avdec_h266, demuxers and muxers for Matroska, MP4 and TS, and parsers for the vvc1 and vvi1 formats) is now available in GStreamer 1.26 thanks to Igalia's work. This allows user applications such as the WebKitGTK web browser to leverage the hardware accelerated decoding provided by VAAPI to play H.266 video using GStreamer.
Igalia has also been one of the top contributors to GStreamer Rust, with 43 contributions. Most of the commits there have been related to Vulkan Video.
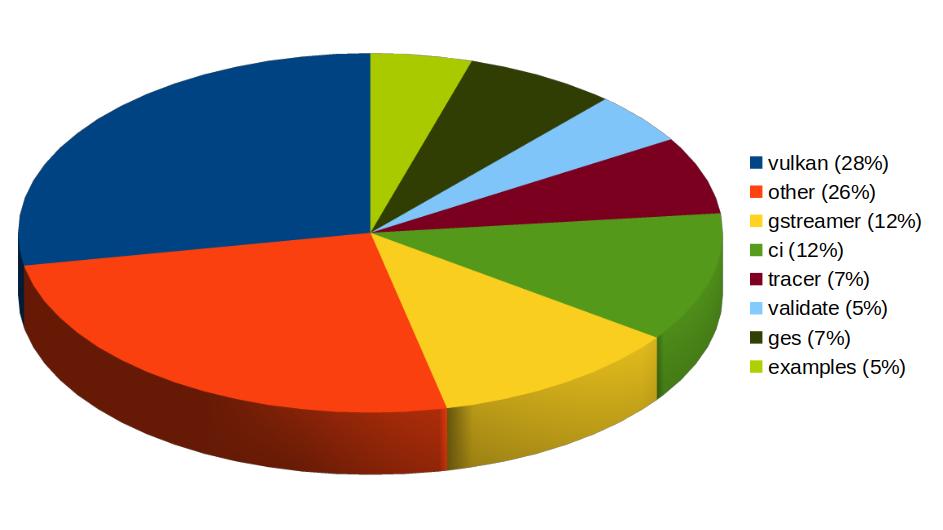
In addition to GStreamer, the team also has a strong presence in WebKit, where we leverage our GStreamer knowledge to implement many features of the web engine related to multimedia. From the 1739 contributions to the WebKit project done last year by Igalia, the Multimedia team has made 323 of them. Nearly one third of those have been related to generic multimedia playback, and the rest have been on areas such as WebRTC, MediaStream, MSE, WebAudio, a new Quirks system to provide adaptations for specific hardware multimedia platforms at runtime, WebCodecs or MediaRecorder.
We're happy about what we've achieved along the year and look forward to maintaining this success and bringing even more exciting features and contributions in 2026.
0  0
0 
26 Jan 2026 9:34am GMT
05 Dec 2025
Planet Maemo
Meow: Process log text files as if you could make cat speak
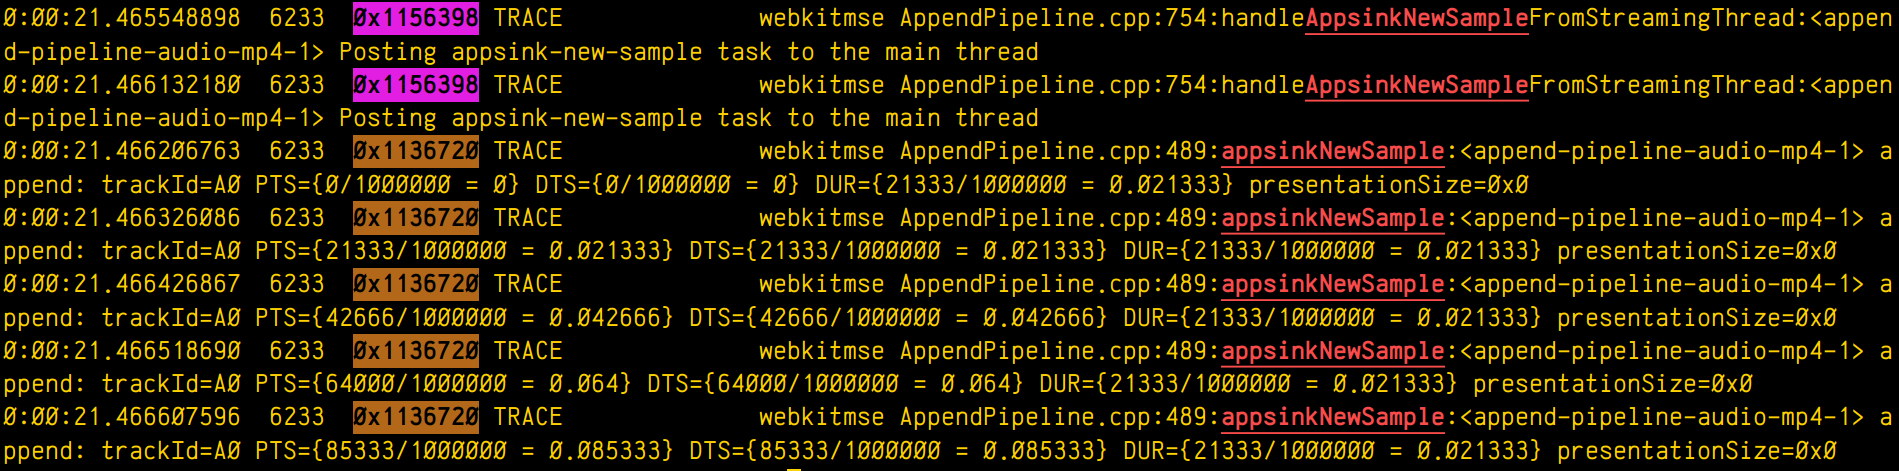
Some years ago I had mentioned some command line tools I used to analyze and find useful information on GStreamer logs. I've been using them consistently along all these years, but some weeks ago I thought about unifying them in a single tool that could provide more flexibility in the mid term, and also as an excuse to unrust my Rust knowledge a bit. That's how I wrote Meow, a tool to make cat speak (that is, to provide meaningful information).
The idea is that you can cat a file through meow and apply the filters, like this:
cat /tmp/log.txt | meow appsinknewsample n:V0 n:video ht: \

ft:-0:00:21.466607596 's:#([A-za-z][A-Za-z]*/)*#'
which means "select those lines that contain appsinknewsample (with case insensitive matching), but don't contain V0 nor video (that is, by exclusion, only that contain audio, probably because we've analyzed both and realized that we should focus on audio for our specific problem), highlight the different thread ids, only show those lines with timestamp lower than 21.46 sec, and change strings like Source/WebCore/platform/graphics/gstreamer/mse/AppendPipeline.cpp to become just AppendPipeline.cpp", to get an output as shown in this terminal screenshot:
Cool, isn't it? After all, I'm convinced that the answer to any GStreamer bug is always hidden in the logs (or will be, as soon as I add "just a couple of log lines more, bro"  0 0
0 0
05 Dec 2025 11:16am GMT
15 Oct 2025
Planet Maemo
Dzzee 1.9.0 for N800/N810/N900/N9/Leste


1 0
15 Oct 2025 11:31am GMT
18 Sep 2022
Planet Openmoko
Harald "LaF0rge" Welte: Deployment of future community TDMoIP hub
I've mentioned some of my various retronetworking projects in some past blog posts. One of those projects is Osmocom Community TDM over IP (OCTOI). During the past 5 or so months, we have been using a number of GPS-synchronized open source icE1usb interconnected by a new, efficient but strill transparent TDMoIP protocol in order to run a distributed TDM/PDH network. This network is currently only used to provide ISDN services to retronetworking enthusiasts, but other uses like frame relay have also been validated.
So far, the central hub of this OCTOI network has been operating in the basement of my home, behind a consumer-grade DOCSIS cable modem connection. Given that TDMoIP is relatively sensitive to packet loss, this has been sub-optimal.
Luckily some of my old friends at noris.net have agreed to host a new OCTOI hub free of charge in one of their ultra-reliable co-location data centres. I'm already hosting some other machines there for 20+ years, and noris.net is a good fit given that they were - in their early days as an ISP - the driving force in the early 90s behind one of the Linux kernel ISDN stracks called u-isdn. So after many decades, ISDN returns to them in a very different way.
Side note: In case you're curious, a reconstructed partial release history of the u-isdn code can be found on gitea.osmocom.org
But I digress. So today, there was the installation of this new OCTOI hub setup. It has been prepared for several weeks in advance, and the hub contains two circuit boards designed entirely only for this use case. The most difficult challenge was the fact that this data centre has no existing GPS RF distribution, and the roof is ~ 100m of CAT5 cable (no fiber!) away from the roof. So we faced the challenge of passing the 1PPS (1 pulse per second) signal reliably through several steps of lightning/over-voltage protection into the icE1usb whose internal GPS-DO serves as a grandmaster clock for the TDM network.
The equipment deployed in this installation currently contains:
-
a rather beefy Supermicro 2U server with EPYC 7113P CPU and 4x PCIe, two of which are populated with Digium TE820 cards resulting in a total of 16 E1 ports
-
an icE1usb with RS422 interface board connected via 100m RS422 to an Ericsson GPS03 receiver. There's two layers of of over-voltage protection on the RS422 (each with gas discharge tubes and TVS) and two stages of over-voltage protection in the coaxial cable between antenna and GPS receiver.
-
a Livingston Portmaster3 RAS server
-
a Cisco AS5400 RAS server
For more details, see this wiki page and this ticket
Now that the physical deployment has been made, the next steps will be to migrate all the TDMoIP links from the existing user base over to the new hub. We hope the reliability and performance will be much better than behind DOCSIS.
In any case, this new setup for sure has a lot of capacity to connect many more more users to this network. At this point we can still only offer E1 PRI interfaces. I expect that at some point during the coming winter the project for remote TDMoIP BRI (S/T, S0-Bus) connectivity will become available.
Acknowledgements
I'd like to thank anyone helping this effort, specifically * Sylvain "tnt" Munaut for his work on the RS422 interface board (+ gateware/firmware) * noris.net for sponsoring the co-location * sysmocom for sponsoring the EPYC server hardware
18 Sep 2022 10:00pm GMT
08 Sep 2022
Planet Openmoko
Harald "LaF0rge" Welte: Progress on the ITU-T V5 access network front
Almost one year after my post regarding first steps towards a V5 implementation, some friends and I were finally able to visit Wobcom, a small German city carrier and pick up a lot of decommissioned POTS/ISDN/PDH/SDH equipment, primarily V5 access networks.
This means that a number of retronetworking enthusiasts now have a chance to play with Siemens Fastlink, Nokia EKSOS and DeTeWe ALIAN access networks/multiplexers.
My primary interest is in Nokia EKSOS, which looks like an rather easy, low-complexity target. As one of the first steps, I took PCB photographs of the various modules/cards in the shelf, take note of the main chip designations and started to search for the related data sheets.
The results can be found in the Osmocom retronetworking wiki, with https://osmocom.org/projects/retronetworking/wiki/Nokia_EKSOS being the main entry page, and sub-pages about
In short: Unsurprisingly, a lot of Infineon analog and digital ICs for the POTS and ISDN ports, as well as a number of Motorola M68k based QUICC32 microprocessors and several unknown ASICs.
So with V5 hardware at my disposal, I've slowly re-started my efforts to implement the LE (local exchange) side of the V5 protocol stack, with the goal of eventually being able to interface those V5 AN with the Osmocom Community TDM over IP network. Once that is in place, we should also be able to offer real ISDN Uk0 (BRI) and POTS lines at retrocomputing events or hacker camps in the coming years.
08 Sep 2022 10:00pm GMT
Harald "LaF0rge" Welte: Clock sync trouble with Digium cards and timing cables
If you have ever worked with Digium (now part of Sangoma) digital telephony interface cards such as the TE110/410/420/820 (single to octal E1/T1/J1 PRI cards), you will probably have seen that they always have a timing connector, where the timing information can be passed from one card to another.
In PDH/ISDN (or even SDH) networks, it is very important to have a synchronized clock across the network. If the clocks are drifting, there will be underruns or overruns, with associated phase jumps that are particularly dangerous when analog modem calls are transported.
In traditional ISDN use cases, the clock is always provided by the network operator, and any customer/user side equipment is expected to synchronize to that clock.
So this Digium timing cable is needed in applications where you have more PRI lines than possible with one card, but only a subset of your lines (spans) are connected to the public operator. The timing cable should make sure that the clock received on one port from the public operator should be used as transmit bit-clock on all of the other ports, no matter on which card.
Unfortunately this decades-old Digium timing cable approach seems to suffer from some problems.
bursty bit clock changes until link is up
The first problem is that downstream port transmit bit clock was jumping around in bursts every two or so seconds. You can see an oscillogram of the E1 master signal (yellow) received by one TE820 card and the transmit of the slave ports on the other card at https://people.osmocom.org/laforge/photos/te820_timingcable_problem.mp4
As you can see, for some seconds the two clocks seem to be in perfect lock/sync, but in between there are periods of immense clock drift.
What I'd have expected is the behavior that can be seen at https://people.osmocom.org/laforge/photos/te820_notimingcable_loopback.mp4 - which shows a similar setup but without the use of a timing cable: Both the master clock input and the clock output were connected on the same TE820 card.
As I found out much later, this problem only occurs until any of the downstream/slave ports is fully OK/GREEN.
This is surprising, as any other E1 equipment I've seen always transmits at a constant bit clock irrespective whether there's any signal in the opposite direction, and irrespective of whether any other ports are up/aligned or not.
But ok, once you adjust your expectations to this Digium peculiarity, you can actually proceed.
clock drift between master and slave cards
Once any of the spans of a slave card on the timing bus are fully aligned, the transmit bit clocks of all of its ports appear to be in sync/lock - yay - but unfortunately only at the very first glance.
When looking at it for more than a few seconds, one can see a slow, continuous drift of the slave bit clocks compared to the master :(
Some initial measurements show that the clock of the slave card of the timing cable is drifting at about 12.5 ppb (parts per billion) when compared against the master clock reference.
This is rather disappointing, given that the whole point of a timing cable is to ensure you have one reference clock with all signals locked to it.
The work-around
If you are willing to sacrifice one port (span) of each card, you can work around that slow-clock-drift issue by connecting an external loopback cable. So the master card is configured to use the clock provided by the upstream provider. Its other ports (spans) will transmit at the exact recovered clock rate with no drift. You can use any of those ports to provide the clock reference to a port on the slave card using an external loopback cable.
In this setup, your slave card[s] will have perfect bit clock sync/lock.
Its just rather sad that you need to sacrifice ports just for achieving proper clock sync - something that the timing connectors and cables claim to do, but in reality don't achieve, at least not in my setup with the most modern and high-end octal-port PCIe cards (TE820).
08 Sep 2022 10:00pm GMT