26 Jan 2026
 Planet Maemo
Igalia Multimedia contributions in 2025
Now that 2025 is over, it's time to look back and feel proud of the path we've walked. Last year has been really exciting in terms of contributions to GStreamer and WebKit for the Igalia Multimedia team.
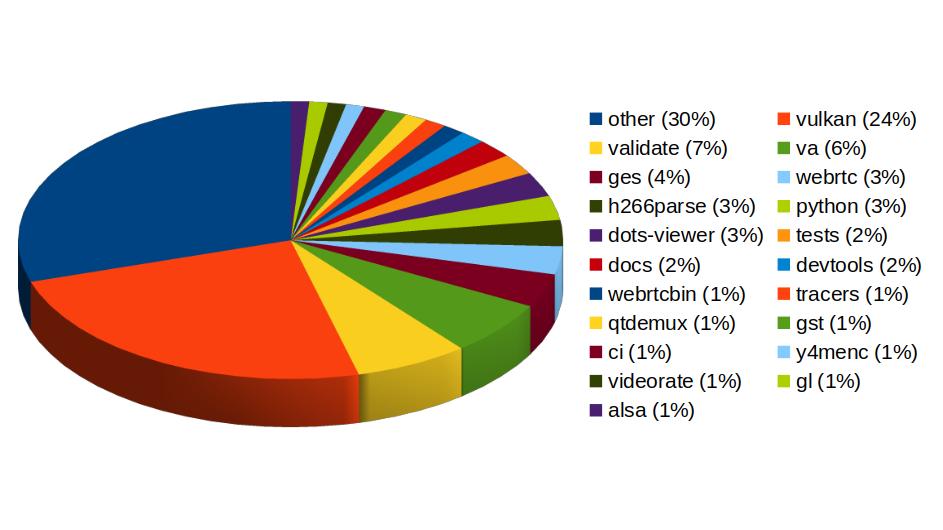
With more than 459 contributions along the year, we've been one of the top contributors to the GStreamer project, in areas like Vulkan Video, GstValidate, VA, GStreamer Editing Services, WebRTC or H.266 support.
In Vulkan Video we've worked on the VP9 video decoder, and cooperated with other contributors to push the AV1 decoder as well. There's now an H.264 base class for video encoding that is designed to support general hardware-accelerated processing.
GStreaming Editing Services, the framework to build video editing applications, has gained time remapping support, which now allows to include fast/slow motion effects in the videos. Video transformations (scaling, cropping, rounded corners, etc) are now hardware-accelerated thanks to the addition of new Skia-based GStreamer elements and integration with OpenGL. Buffer pool tuning and pipeline improvements have helped to optimize memory usage and performance, enabling the edition of 4K video at 60 frames per second. Much of this work to improve and ensure quality in GStreamer Editing Services has also brought improvements in the GstValidate testing framework, which will be useful for other parts of GStreamer.
Regarding H.266 (VVC), full playback support (with decoders such as vvdec and avdec_h266, demuxers and muxers for Matroska, MP4 and TS, and parsers for the vvc1 and vvi1 formats) is now available in GStreamer 1.26 thanks to Igalia's work. This allows user applications such as the WebKitGTK web browser to leverage the hardware accelerated decoding provided by VAAPI to play H.266 video using GStreamer.
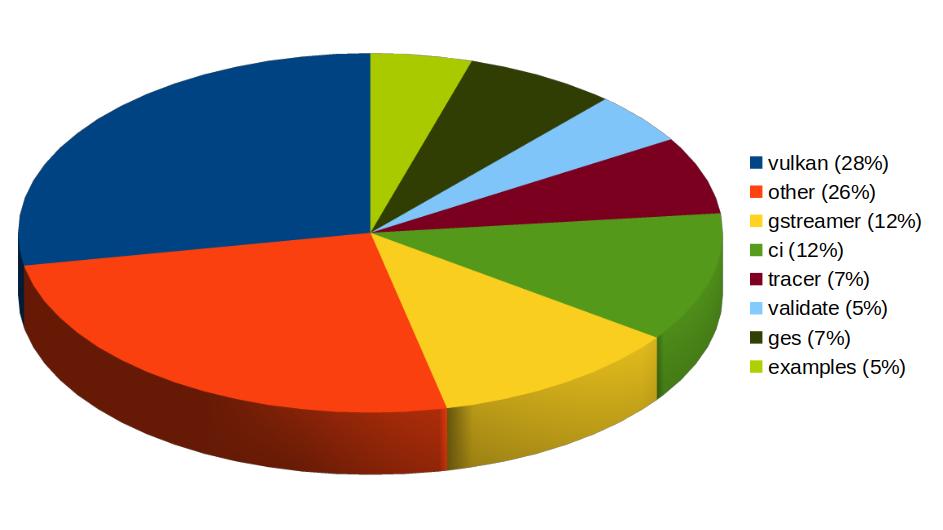
Igalia has also been one of the top contributors to GStreamer Rust, with 43 contributions. Most of the commits there have been related to Vulkan Video.
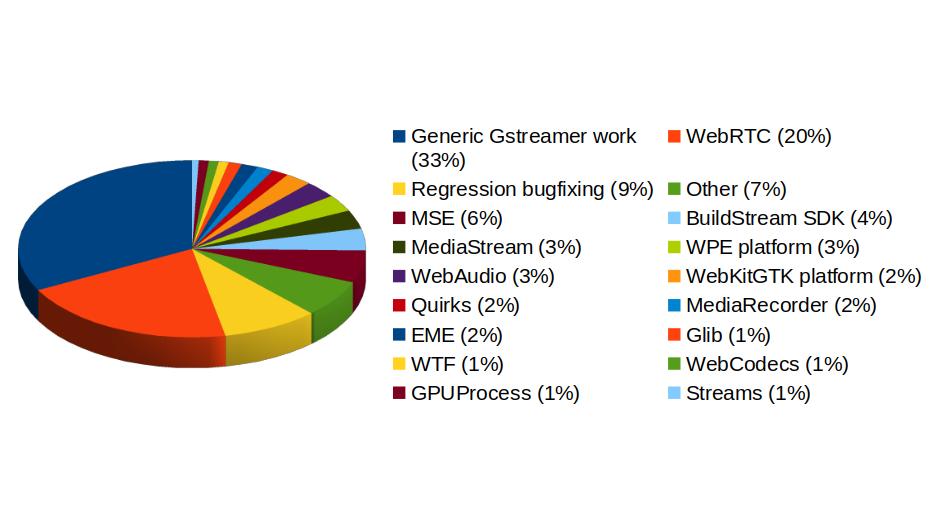
In addition to GStreamer, the team also has a strong presence in WebKit, where we leverage our GStreamer knowledge to implement many features of the web engine related to multimedia. From the 1739 contributions to the WebKit project done last year by Igalia, the Multimedia team has made 323 of them. Nearly one third of those have been related to generic multimedia playback, and the rest have been on areas such as WebRTC, MediaStream, MSE, WebAudio, a new Quirks system to provide adaptations for specific hardware multimedia platforms at runtime, WebCodecs or MediaRecorder.
We're happy about what we've achieved along the year and look forward to maintaining this success and bringing even more exciting features and contributions in 2026.
0  0
0 
26 Jan 2026 9:34am GMT
05 Dec 2025
Planet Maemo
Meow: Process log text files as if you could make cat speak
Some years ago I had mentioned some command line tools I used to analyze and find useful information on GStreamer logs. I've been using them consistently along all these years, but some weeks ago I thought about unifying them in a single tool that could provide more flexibility in the mid term, and also as an excuse to unrust my Rust knowledge a bit. That's how I wrote Meow, a tool to make cat speak (that is, to provide meaningful information).
The idea is that you can cat a file through meow and apply the filters, like this:
cat /tmp/log.txt | meow appsinknewsample n:V0 n:video ht: \

ft:-0:00:21.466607596 's:#([A-za-z][A-Za-z]*/)*#'
which means "select those lines that contain appsinknewsample (with case insensitive matching), but don't contain V0 nor video (that is, by exclusion, only that contain audio, probably because we've analyzed both and realized that we should focus on audio for our specific problem), highlight the different thread ids, only show those lines with timestamp lower than 21.46 sec, and change strings like Source/WebCore/platform/graphics/gstreamer/mse/AppendPipeline.cpp to become just AppendPipeline.cpp", to get an output as shown in this terminal screenshot:
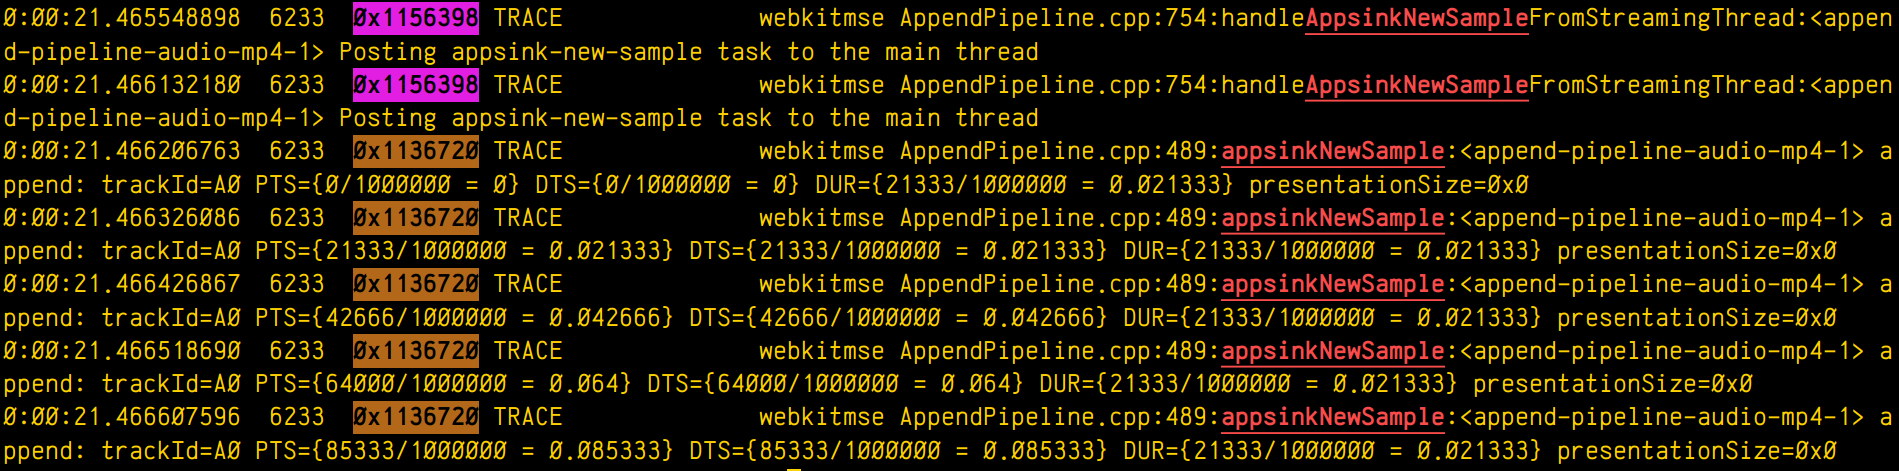
Cool, isn't it? After all, I'm convinced that the answer to any GStreamer bug is always hidden in the logs (or will be, as soon as I add "just a couple of log lines more, bro"  0 0
0 0
05 Dec 2025 11:16am GMT
15 Oct 2025
Planet Maemo
Dzzee 1.9.0 for N800/N810/N900/N9/Leste


1 0
15 Oct 2025 11:31am GMT
05 Jun 2025
Planet Maemo
Mobile blogging, the past and the future
This blog has been running more or less continuously since mid-nineties. The site has existed in multiple forms, and with different ways to publish. But what's common is that at almost all points there was a mechanism to publish while on the move.
Psion, documents over FTP
In the early 2000s we were into adventure motorcycling. To be able to share our adventures, we implemented a way to publish blogs while on the go. The device that enabled this was the Psion Series 5, a handheld computer that was very much a device ahead of its time.

The Psion had a reasonably sized keyboard and a good native word processing app. And battery life good for weeks of usage. Writing while underway was easy. The Psion could use a mobile phone as a modem over an infrared connection, and with that we could upload the documents to a server over FTP.
Server-side, a cron job would grab the new documents, converting them to HTML and adding them to our CMS.
In the early days of GPRS, getting this to work while roaming was quite tricky. But the system served us well for years.
If we wanted to include photos to the stories, we'd have to find an Internet cafe.
- To the Alps is a post from these times. Lots more in the motorcycling category
SMS and MMS
For an even more mobile setup, I implemented an SMS-based blogging system. We had an old phone connected to a computer back in the office, and I could write to my blog by simply sending a text. These would automatically end up as a new paragraph in the latest post. If I started the text with NEWPOST, an empty blog post would be created with the rest of that message's text as the title.
- In the Caucasus is a good example of a post from this era
As I got into neogeography, I could also send a NEWPOSITION message. This would update my position on the map, connecting weather metadata to the posts.
As camera phones became available, we wanted to do pictures too. For the Death Monkey rally where we rode minimotorcycles from Helsinki to Gibraltar, we implemented an MMS-based system. With that the entries could include both text and pictures. But for that you needed a gateway, which was really only realistic for an event with sponsors.
- Mystery of the Missing Monkey is typical. Some more in Internet Archive
Photos over email
A much easier setup than MMS was to slightly come back to the old Psion setup, but instead of word documents, sending email with picture attachments. This was something that the new breed of (pre-iPhone) smartphones were capable of. And by now the roaming question was mostly sorted.
And so my blog included a new "moblog" section. This is where I could share my daily activities as poor-quality pictures. Sort of how people would use Instagram a few years later.

- Internet Archive has some of my old moblogs but nowadays, I post similar stuff on Pixelfed
Pause
Then there was sort of a long pause in mobile blogging advancements. Modern smartphones, data roaming, and WiFi hotspots had become ubiquitous.
In the meanwhile the blog also got migrated to a Jekyll-based system hosted on AWS. That means the old Midgard-based integrations were off the table.
And I traveled off-the-grid rarely enough that it didn't make sense to develop a system.
But now that we're sailing offshore, that has changed. Time for new systems and new ideas. Or maybe just a rehash of the old ones?
Starlink, Internet from Outer Space
Most cruising boats - ours included - now run the Starlink satellite broadband system. This enables full Internet, even in the middle of an ocean, even video calls! With this, we can use normal blogging tools. The usual one for us is GitJournal, which makes it easy to write Jekyll-style Markdown posts and push them to GitHub.
However, Starlink is a complicated, energy-hungry, and fragile system on an offshore boat. The policies might change at any time preventing our way of using it, and also the dishy itself, or the way we power it may fail.
But despite what you'd think, even on a nerdy boat like ours, loss of Internet connectivity is not an emergency. And this is where the old-style mobile blogging mechanisms come handy.
- Any of the 2025 Atlantic crossing posts is a good example of this setup in action
Inreach, texting with the cloud
Our backup system to Starlink is the Garmin Inreach. This is a tiny battery-powered device that connects to the Iridium satellite constellation. It allows tracking as well as basic text messaging.
When we head offshore we always enable tracking on the Inreach. This allows both our blog and our friends ashore to follow our progress.
I also made a simple integration where text updates sent to Garmin MapShare get fetched and published on our blog. Right now this is just plain text-based entries, but one could easily implement a command system similar to what I had over SMS back in the day.
One benefit of the Inreach is that we can also take it with us when we go on land adventures. And it'd even enable rudimentary communications if we found ourselves in a liferaft.
- There are various InReach integration hacks that could be used for more sophisticated data transfer
Sailmail and email over HF radio
The other potential backup for Starlink failures would be to go seriously old-school. It is possible to get email access via a SSB radio and a Pactor (or Vara) modem.
Our boat is already equipped with an isolated aft stay that can be used as an antenna. And with the popularity of Starlink, many cruisers are offloading their old HF radios.
Licensing-wise this system could be used either as a marine HF radio (requiring a Long Range Certificate), or amateur radio. So that part is something I need to work on. Thankfully post-COVID, radio amateur license exams can be done online.
With this setup we could send and receive text-based email. The Airmail application used for this can even do some automatic templating for position reports. We'd then need a mailbox that can receive these mails, and some automation to fetch and publish.
- Sailmail and No Foreign Land support structured data via email to update position. Their formats could be useful inspiration
0 0
05 Jun 2025 12:00am GMT
16 Oct 2024
Planet Maemo
Adding buffering hysteresis to the WebKit GStreamer video player
The <video> element implementation in WebKit does its job by using a multiplatform player that relies on a platform-specific implementation. In the specific case of glib platforms, which base their multimedia on GStreamer, that's MediaPlayerPrivateGStreamer.

The player private can have 3 buffering modes:
- On-disk buffering: This is the typical mode on desktop systems, but is frequently disabled on purpose on embedded devices to avoid wearing out their flash storage memories. All the video content is downloaded to disk, and the buffering percentage refers to the total size of the video. A GstDownloader element is present in the pipeline in this case. Buffering level monitoring is done by polling the pipeline every second, using the
fillTimerFired()method. - In-memory buffering: This is the typical mode on embedded systems and on desktop systems in case of streamed (live) content. The video is downloaded progressively and only the part of it ahead of the current playback time is buffered. A GstQueue2 element is present in the pipeline in this case. Buffering level monitoring is done by listening to GST_MESSAGE_BUFFERING bus messages and using the buffering level stored on them. This is the case that motivates the refactoring described in this blog post, what we actually wanted to correct in Broadcom platforms, and what motivated the addition of hysteresis working on all the platforms.
- Local files: Files, MediaStream sources and other special origins of video don't do buffering at all (no GstDownloadBuffering nor GstQueue2 element is present on the pipeline). They work like the on-disk buffering mode in the sense that
fillTimerFired()is used, but the reported level is relative, much like in the streaming case. In the initial version of the refactoring I was unaware of this third case, and only realized about it when tests triggered the assert that I added to ensure that the on-disk buffering method was working in GST_BUFFERING_DOWNLOAD mode.
The current implementation (actually, its wpe-2.38 version) was showing some buffering problems on some Broadcom platforms when doing in-memory buffering. The buffering levels monitored by MediaPlayerPrivateGStreamer weren't accurate because the Nexus multimedia subsystem used on Broadcom platforms was doing its own internal buffering. Data wasn't being accumulated in the GstQueue2 element of playbin, because BrcmAudFilter/BrcmVidFilter was accepting all the buffers that the queue could provide. Because of that, the player private buffering logic was erratic, leading to many transitions between "buffer completely empty" and "buffer completely full". This, it turn, caused many transitions between the HaveEnoughData, HaveFutureData and HaveCurrentData readyStates in the player, leading to frequent pauses and unpauses on Broadcom platforms.

So, one of the first thing I tried to solve this issue was to ask the Nexus PlayPump (the subsystem in charge of internal buffering in Nexus) about its internal levels, and add that to the levels reported by GstQueue2. There's also a GstMultiqueue in the pipeline that can hold a significant amount of buffers, so I also asked it for its level. Still, the buffering level unstability was too high, so I added a moving average implementation to try to smooth it.
All these tweaks only make sense on Broadcom platforms, so they were guarded by ifdefs in a first version of the patch. Later, I migrated those dirty ifdefs to the new quirks abstraction added by Phil. A challenge of this migration was that I needed to store some attributes that were considered part of MediaPlayerPrivateGStreamer before. They still had to be somehow linked to the player private but only accessible by the platform specific code of the quirks. A special HashMap attribute stores those quirks attributes in an opaque way, so that only the specific quirk they belong to knows how to interpret them (using downcasting). I tried to use move semantics when storing the data, but was bitten by object slicing when trying to move instances of the superclass. In the end, moving the responsibility of creating the unique_ptr that stored the concrete subclass to the caller did the trick.
Even with all those changes, undesirable swings in the buffering level kept happening, and when doing a careful analysis of the causes I noticed that the monitoring of the buffering level was being done from different places (in different moments) and sometimes the level was regarded as "enough" and the moment right after, as "insufficient". This was because the buffering level threshold was one single value. That's something that a hysteresis mechanism (with low and high watermarks) can solve. So, a logical level change to "full" would only happen when the level goes above the high watermark, and a logical level change to "low" when it goes under the low watermark level.
For the threshold change detection to work, we need to know the previous buffering level. There's a problem, though: the current code checked the levels from several scattered places, so only one of those places (the first one that detected the threshold crossing at a given moment) would properly react. The other places would miss the detection and operate improperly, because the "previous buffering level value" had been overwritten with the new one when the evaluation had been done before. To solve this, I centralized the detection in a single place "per cycle" (in updateBufferingStatus()), and then used the detection conclusions from updateStates().
So, with all this in mind, I refactored the buffering logic as https://commits.webkit.org/284072@main, so now WebKit GStreamer has a buffering code much more robust than before. The unstabilities observed in Broadcom devices were gone and I could, at last, close Issue 1309.
0 0
16 Oct 2024 6:12am GMT
10 Sep 2024
Planet Maemo
Don’t shoot yourself in the foot with the C++ move constructor
Move semantics can be very useful to transfer ownership of resources, but as many other C++ features, it's one more double edge sword that can harm yourself in new and interesting ways if you don't read the small print.
For instance, if object moving involves super and subclasses, you have to keep an extra eye on what's actually happening. Consider the following classes A and B, where the latter inherits from the former:
#include <stdio.h>
#include <utility>

#define PF printf("%s %p\n", __PRETTY_FUNCTION__, this)

class A {
 public:
 A() { PF; }
 virtual ~A() { PF; }
 A(A&& other)
 {
  PF;
  std::swap(i, other.i);
 }

 int i = 0;
};

class B : public A {
 public:
 B() { PF; }
 virtual ~B() { PF; }
 B(B&& other)
 {
  PF;
  std::swap(i, other.i);
  std::swap(j, other.j);
 }

 int j = 0;
};
If your project is complex, it would be natural that your code involves abstractions, with part of the responsibility held by the superclass, and some other part by the subclass. Consider also that some of that code in the superclass involves move semantics, so a subclass object must be moved to become a superclass object, then perform some action, and then moved back to become the subclass again. That's a really bad idea!
Consider this usage of the classes defined before:
int main(int, char* argv[]) {
 printf("Creating B b1\n");
 B b1;
 b1.i = 1;
 b1.j = 2;
 printf("b1.i = %d\n", b1.i);
 printf("b1.j = %d\n", b1.j);
 printf("Moving (B)b1 to (A)a. Which move constructor will be used?\n");
 A a(std::move(b1));
 printf("a.i = %d\n", a.i);
 // This may be reading memory beyond the object boundaries, which may not be
 // obvious if you think that (A)a is sort of a (B)b1 in disguise, but it's not!
 printf("(B)a.j = %d\n", reinterpret_cast<B&>(a).j);
 printf("Moving (A)a to (B)b2. Which move constructor will be used?\n");
 B b2(reinterpret_cast<B&&>(std::move(a)));
 printf("b2.i = %d\n", b2.i);
 printf("b2.j = %d\n", b2.j);
 printf("^^^ Oops!! Somebody forgot to copy the j field when creating (A)a. Oh, wait... (A)a never had a j field in the first place\n");
 printf("Destroying b2, a, b1\n");
 return 0;
}
If you've read the code, those printfs will have already given you some hints about the harsh truth: if you move a subclass object to become a superclass object, you're losing all the subclass specific data, because no matter if the original instance was one from a subclass, only the superclass move constructor will be used. And that's bad, very bad. This problem is called object slicing. It's specific to C++ and can also happen with copy constructors. See it with your own eyes:
Creating B b1
A::A() 0x7ffd544ca690
B::B() 0x7ffd544ca690
b1.i = 1
b1.j = 2
Moving (B)b1 to (A)a. Which move constructor will be used?
A::A(A&&) 0x7ffd544ca6a0
a.i = 1
(B)a.j = 0
Moving (A)a to (B)b2. Which move constructor will be used?
A::A() 0x7ffd544ca6b0
B::B(B&&) 0x7ffd544ca6b0
b2.i = 1
b2.j = 0
^^^ Oops!! Somebody forgot to copy the j field when creating (A)a. Oh, wait... (A)a never had a j field in the first place
Destroying b2, a, b1
virtual B::~B() 0x7ffd544ca6b0
virtual A::~A() 0x7ffd544ca6b0
virtual A::~A() 0x7ffd544ca6a0
virtual B::~B() 0x7ffd544ca690
virtual A::~A() 0x7ffd544ca690
Why can something that seems so obvious become such a problem, you may ask? Well, it depends on the context. It's not unusual for the codebase of a long lived project to have started using raw pointers for everything, then switching to using references as a way to get rid of null pointer issues when possible, and finally switch to whole objects and copy/move semantics to get rid or pointer issues (references are just pointers in disguise after all, and there are ways to produce null and dangling references by mistake). But this last step of moving from references to copy/move semantics on whole objects comes with the small object slicing nuance explained in this post, and when the size and all the different things to have into account about the project steals your focus, it's easy to forget about this.
So, please remember: never use move semantics that convert your precious subclass instance to a superclass instance thinking that the subclass data will survive. You can regret about it and create difficult to debug problems inadvertedly.
Happy coding!
0 0
10 Sep 2024 7:58am GMT
17 Jun 2024
Planet Maemo
Incorporating 3D Gaussian Splats into the graphics pipeline
3D Gaussian splatting is the emerging rendering technique that is overtaking NeRFs. Since it is centered around point primitives, it is more compatible with traditional graphics pipelines that already support point rendering.
Gaussian splats essentially enhance the concept of point rendering by converting the point primitive into a 3D ellipsoid, which is then projected into 2D during the rendering process.. This concept was initially described in 2002 [3], but the technique of extending Structure from Motion scans in this way was only detailed more recently [1].
In this post, I explore how to integrate Gaussian splats into the traditional graphics pipeline. This allows them to be used alongside triangle-based primitives and interact with them through the depth buffer for occlusion (see header image). This approach also simplifies deployment by eliminating the need for CUDA.
Storage
The original implementation uses .ply files as their checkpoint format, focusing on maintaining training-relevant data structures at the expense of storage efficiency, leading to increased file sizes.
For example, it stores the covariance as scaling and a rotation quaternion, necessitating reconstruction during rendering. A more efficient approach would be to leverage orthogonality, storing only the diagonal and upper triangular vectors, thereby eliminating reconstruction and reducing storage requirements.
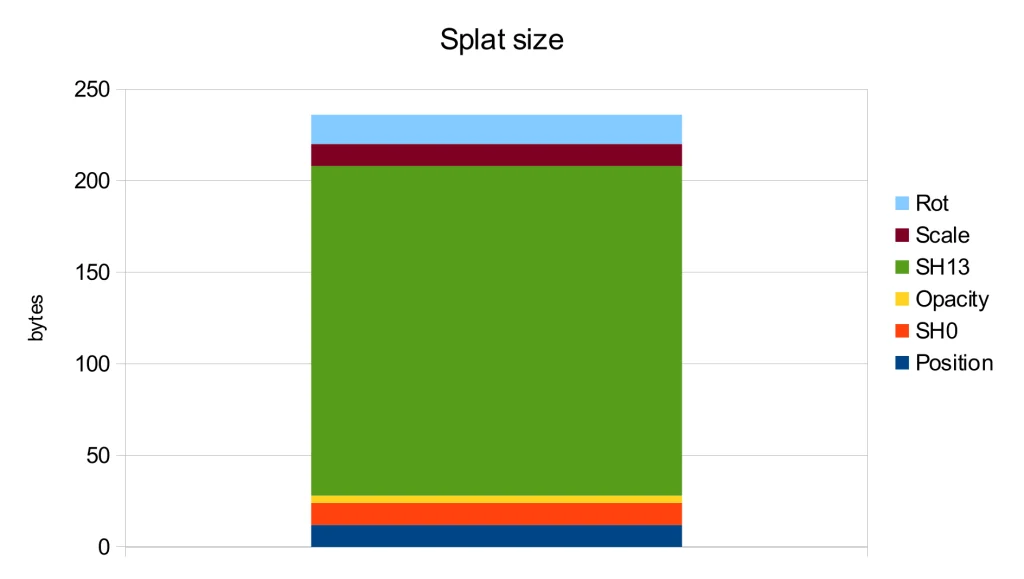
Further analysis of the storage usage for each attribute shows that the spherical harmonics of orders 1-3 are the main contributors to the file size. However, according to the ablation study in the original publication [1], these harmonics only lead to a modest PSNR improvement of 0.5.
Therefore, the most straightforward way to decrease storage is by discarding the higher-order spherical harmonics. Additionally, the level 0 spherical harmonics can be converted into a diffuse color and merged with opacity to form a single RGBA value. These simple yet effective methods were implemented in one of the early WebGL implementations, resulting in the .splat format. As an added benefit, this format can be easily interpreted by viewers unaware of Gaussian splats as a simple colored point cloud:

By directly storing the covariance as previously mentioned we can reduce the precision from float32 to float16, thereby halving the storage needed for that data. Furthermore, since most splats have limited spatial extents, we can also utilize float16 for position data, yielding additional storage savings.
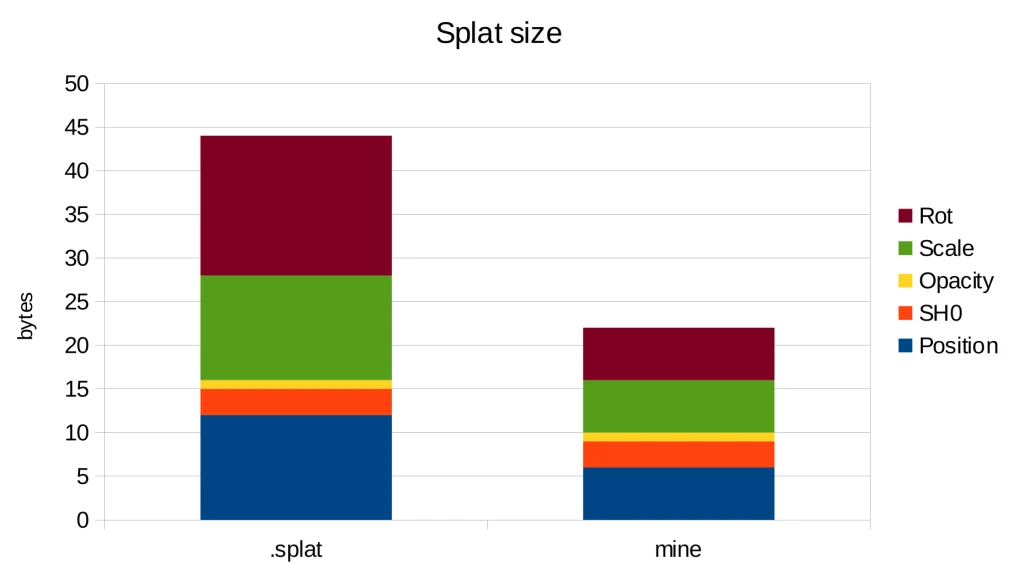
With these changes, we achieve a storage requirement of 22 bytes per splat, in contrast to the 44 bytes needed by the .splat format and 236 bytes in the original implementation. Thus, we have attained a 10x reduction in storage compared to the original implementation simply by using more suitable data types.
Blending
The image formation model presented in the original paper [1] is similar to the NeRF rendering, as it is compared to it. This involves casting a ray and observing its intersection with the splats, which leads to front-to-back blending. This is precisely the approach taken by the provided CUDA implementation.
Blending remains a component of the fixed-function unit within the graphics pipeline, which can be set up for front-to-back blending [2] by using the factors (one_minus_dest_alpha, one) and by multiplying color and alpha in the shader as color.rgb * color.a. This results in the following equation:
\begin{aligned}C_{dst} &= (1 - \alpha_{dst}) \cdot \alpha_{src} C_{src} &+ C_{dst}\\ \alpha_{dst} &= (1 - \alpha_{dst})\cdot\alpha_{src} &+ \alpha_{dst}\end{aligned}
However, this method requires the framebuffer alpha value to be zero before rendering the splats, which is not typically the case as any previous render pass could have written an arbitrary alpha value.
A simple solution is to switch to back-to-front sorting and use the standard alpha blending factors (src_alpha, one_minus_src_alpha) for the following blending equation:
C_{dst} = \alpha_{src} \cdot C_{src} + (1 - \alpha_{src}) \cdot C_{dst}
This allows us to regard Gaussian splats as a special type of particles that can be rendered together with other transparent elements within a scene.
References
- Kerbl, Bernhard, et al. "3d gaussian splatting for real-time radiance field rendering." ACM Transactions on Graphics 42.4 (2023): 1-14.
- Green, Simon. "Volumetric particle shadows." NVIDIA Developer Zone (2008).
- Zwicker, Matthias, et al. "EWA splatting." IEEE Transactions on Visualization and Computer Graphics 8.3 (2002): 223-238.
0 0
17 Jun 2024 1:28pm GMT
30 Apr 2024
Planet Maemo
Dissecting GstSegments
During all these years using GStreamer, I've been having to deal with GstSegments in many situations. I've always have had an intuitive understanding of the meaning of each field, but never had the time to properly write a good reference explanation for myself, ready to be checked at those times when the task at hand stops being so intuitive and nuisances start being important. I used the notes I took during an interesting conversation with Alba and Alicia about those nuisances, during the GStreamer Hackfest in A Coruña, as the seed that evolved into this post.
But what are actually GstSegments? They are the structures that track the values needed to synchronize the playback of a region of interest in a media file.
GstSegments are used to coordinate the translation between Presentation Timestamps (PTS), supplied by the media, and Runtime.
PTS is the timestamp that specifies, in buffer time, when the frame must be displayed on screen. This buffer time concept (called buffer running-time in the docs) refers to the ideal time flow where rate isn't being had into account.
Decode Timestamp (DTS) is the timestamp that specifies, in buffer time, when the frame must be supplied to the decoder. On decoders supporting P-frames (forward-predicted) and B-frames (bi-directionally predicted), the PTS of the frames reaching the decoder may not be monotonic, but the PTS of the frames reaching the sinks are (the decoder outputs monotonic PTSs).
Runtime (called clock running time in the docs) is the amount of physical time that the pipeline has been playing back. More specifically, the Runtime of a specific frame indicates the physical time that has passed or must pass until that frame is displayed on screen. It starts from zero.
Base time is the point when the Runtime starts with respect to the input timestamp in buffer time (PTS or DTS). It's the Runtime of the PTS=0.
Start, stop, duration: Those fields are buffer timestamps that specify when the piece of media that is going to be played starts, stops and how long that portion of the media is (the absolute difference between start and stop, and I mean absolute because a segment being played backwards may have a higher start buffer timestamp than what its stop buffer timestamp is).
Position is like the Runtime, but in buffer time. This means that in a video being played back at 2x, Runtime would flow at 1x (it's physical time after all, and reality goes at 1x pace) and Position would flow at 2x (the video moves twice as fast than physical time).
The Stream Time is the position in the stream. Not exactly the same concept as buffer time. When handling multiple streams, some of them can be offset with respect to each other, not starting to be played from the begining, or even can have loops (eg: repeating the same sound clip from PTS=100 until PTS=200 intefinitely). In this case of repeating, the Stream time would flow from PTS=100 to PTS=200 and then go back again to the start position of the sound clip (PTS=100). There's a nice graphic in the docs illustrating this, so I won't repeat it here.
Time is the base of Stream Time. It's the Stream time of the PTS of the first frame being played. In our previous example of the repeating sound clip, it would be 100.
There are also concepts such as Rate and Applied Rate, but we didn't get into them during the discussion that motivated this post.
So, for translating between Buffer Time (PTS, DTS) and Runtime, we would apply this formula:
Runtime = BufferTime * ( Rate * AppliedRate ) + BaseTime
And for translating between Buffer Time (PTS, DTS) and Stream Time, we would apply this other formula:
StreamTime = BufferTime * AppliedRate + Time
And that's it. I hope these notes in the shape of a post serve me as reference in the future. Again, thanks to Alicia, and especially to Alba, for the valuable clarifications during the discussion we had that day in the Igalia office. This post wouldn't have been possible without them.
0 0
30 Apr 2024 6:00am GMT
02 Feb 2024
Planet Maemo
libSDL2 and VVVVVV for the Wii
Just a quick update on something that I've been working on in my free time.
I recently refurbished my old Nintendo Wii, and for some reason I cannot yet explain (not even to myself) I got into homebrew programming and decided to port libSDL (the 2.x version -- a 1.x port already existed) to it. The result of this work is already available via the devkitPro distribution, and although I'm sure there are still many bugs, it's overall quite usable.
In order to prove it, I ported the game VVVVVV to the Wii:
During the process I had to fix quite a few bugs in my libSDL port and in a couple of other libraries used by VVVVVV, which will hopefully will make it easier to port more games. There's still an issue that bothers me, where the screen resolution seems to be not totally supported by my TV (or is it the HDMI adaptor's fault?), resulting in a few pixels being cut at the top and at the bottom of the screen. But unless you are a perfectionist, it's a minor issue.
In case you have a Wii to spare, or wouldn't mind playing on the Dolphin emulator, here's the link to the VVVVVV release. Have fun! :-)
0 0
02 Feb 2024 5:50pm GMT
30 Nov 2023
Planet Maemo
Maemo Community e.V. - Invitation to the General Assembly 2023
Maemo Community e.V. - Invitation to the General Assembly 2023
Dear Member,
The meeting will be held on Friday, December 29th 2023 at 12:00 CET on irc.libera.chat channel #maemo-meeting.
Unless any further issues are raised, the agenda includes the following topics:
1. Welcome by the Chairman of the Board
2. Determination of the proper convocation and the quorum of the General Assembly
3. Acceptance of the annual report for the fiscal year and actions of the Executive
6. Any other business
Requests for additions to the agenda must be submitted to the Board in writing one week prior to the meeting (§ 9.2 of the Statutes).
On Behalf of the Maemo Council, Jussi Ohenoja
0 0
30 Nov 2023 8:52am GMT
15 Nov 2023
Planet Maemo
stb_image_resize2.h – performance
Recently there was an large rework to the STB single-file image_resize library (STBIR) bumping it to 2.0. While the v1 was really slow and merely usable if you needed to quickly get some code running, the 2.0 rewrite claims to be more considerate of performance by using SIMD. So lets put it to a test.
As references, I chose the moderately optimized C only implementation of Ogre3D and the highly optimized SIMD implementation in OpenCV.
Below you find time to scale a 1024x1024px byte image to 512x512px. All libraries were set to linear interpolation. The time is the accumulated time for 200 runs.
| RGB | RGBA | |
| Ogre3D 14.1.2 | 660 ms | 668 ms |
| STBIR 2.01 | 632 ms | 690 ms |
| OpenCV 4.8 | 245 ms | 254 ms |
For the RGBA test, STIBIR was set to the STBIR_4CHANNEL pixel layout. All libraries were compiled with -O2 -msse. Additionally OpenCV could dispatch AVX2 code. Enabling AVX2 with STBIR actually decreased performance.
Note that while STBIR has no performance advantage over a C only implementation for the simple resizing case, it offers some neat features if you want to handle SRGB data or non-premultiplied alpha.
0 0
15 Nov 2023 1:50pm GMT
27 Jul 2023
Planet Maemo
The bypass paywalls on a phone
Bypassing paywalls is a sport for some. And it ain't hard for Desktop Browsers. Just install a addon in your favorite Desktop Browser.
Unfortunately this didn't work on a Android or iPhone phone. Nor on Sailfish OS with its Android emulation. Because over there browsers like Chrome and Chromium don't allow extensions to be installed. Firefox does have some limited support for addons, but it can't open local XPI files. Its addon menu doesn't contain the addon and the addon website for it sees the running browser as incompatible.
Luckily you have Kiwi Browser, which is a Chrome based browser that did not disable extensions to be installed.
Once Kiwi is installed you can go to either chrome://extensions or kiwi://extensions, enable Developer mode and then open the zip file as explained in the Readme.md.
ps. For Sailfish I had to install an older version of Kiwi Browser, as the most recent version doesn't seem to work.
0 0
27 Jul 2023 8:37am GMT
04 Jun 2023
Planet Maemo
Will the internet forget russophobia?
I've often wondering what will happen when this horrific war in Europe will finally be over. I won't be discussing politics here, but what is mostly interesting to me is how (and if) all the companies who made high proclaims about not doing business with Russia will justify their getting back into the Russian market. They will probably count on the fact that the war will be long, and that people will forget what these companies' stance was. After all, the world has forget about all the companies who collaborated with the Nazi regime, so we can expect the same to happen with this war.
But I don't think that's right: if you made a mistake, you should be held accountable for it. You might be wondering what is the "mistake" I'm talking about: that's russophobia, indeed. To put it simply, and make a concrete example: if The Qt Company stops doing business with Russian companies and blocks its downloads page to Russian IP addresses because of the war, without being forced by the government to do so, but does not take similar measures against other countries who wage wars which have caused way more deaths and displacement of individuals, well, that's what I call "russophobia". Of course, I'm aware that there's way more than that, and that the hatred for all what is Russian (including culture and sport competitions) is an even bigger issue, but in this blog post I'm especially focused on the IT world, so please forgive my semi-intentional narrow-mindness on this topic.
Now, I'm fully aware that we live in a mediatic bubble that directs our decisions in a way that is almost automatic, and I'm sure that most people working for companies who took russophobic decisions are not themselves russophobic at all (and I'm not dismissing the possibility that even the very same people who took these decisions might not be russophobic) and that these decisions were taken on impulse, because "everyone else is doing the same" and due to the media pressure that if you don't do that, you might get accused of supporting the "wrong" side of the war.
But that's not an excuse, especially for "smart" people like IT engineers (and I put the adjective between quotes for a reason), and especially after the initial heat has passed and when, after more than one year of war, we should have been exposed to different point of views and be able to evaluate the situation more rationally. It has been therefore especially stunning for me to learn that the Linux Kernel community, and hence The Linux Foundation, has recently given room to russophobic behaviours, refusing a patch coming from the Russian company Baikal (a CPU maker). For the record, the incriminated patch was not related to supporting hardware produced by this company (not that this would make the deed less serious, but at least one could have argued that there could be some spot of logic in it):
From: Jakub Kicinski <kuba@kernel.org>
To: Serge Semin <Sergey.Semin@baikalelectronics.ru>
[...]

On Tue, 14 Mar 2023 01:42:24 +0300 Serge Semin wrote:
> From: Serge Semin <Sergey.Semin@baikalelectronics.ru>

We don't feel comfortable accepting patches from or relating
to hardware produced by your organization.

Please withhold networking contributions until further notice.
(here the link to the original discussion). One week later, someone denounced this as a violation to the Code of Conduct committee (unfortunately the only link I could find to this is coming from a Russian IT forum, and any other references seem to have been removed from DuckDuckGo and Google), only to receive a reply that it was all fine.
To me this is not fine. The war will end, sooner or later, but it bothers me that we never learn from the past and repeat the same mistakes over and over. We apparently know a lot about propaganda, yet we fail to recognize it when it influences our own mind and actions. My humble contribution is the creation of a page where I list the companies who have taken russophobic actions, and, on the opposite side, companies (like Flickr and Zorin OS) who have stood out for positive messages and helpful actions. My hope is that some of the listed companies will find the courage to review their actions, and either correct their stance, or at least clarify their reasons. So, I hereby present
where you'll find some of the good and some of the bad companies. I'm sure I'm missing plenty of them: I just started recollecting my memories and searching online a couple of days ago. I created this as a GitHub project, because indeed I'm looking forward for contributions, to help me make the lists more complete. I need to stress that the fact that a company has announced the suspension of its business in Russia does not automatically make it russophobic: what we need to look at is the reason for that decision: companies like LEGO and Nintendo, for example, have suspended their operations citing logistic and financial reasons; no judgement involved.
Let me repeat it once more, just to make sure there are no misunderstandings: it's perfectly fine for businesses to take a stance on politics, and sometimes it might be even praiseworthy; but if a company is international, and does not apply the same reasoning to other armed conflicts, or seem to care only about certain human rights violations and not others, then it's a case of double standards which we need to be aware of, and make the company think twice about it. And that's also the reason why you won't find any Ukrainian company among the "bad" ones, because in their case the reaction is perfectly understandable and they can hardly be accused of adopting double standards (well, technically speaking, they are adopting double standards, but when you are so directly impacted I think it does not deserve a blame): if it's your house which burns, you should definitely scream about it, even if you previously have been silent about your neighbour house's burning.
I'm especially looking forward for more "good" companies, who have shown empathy towards the people affected by the war (and maybe even collected money to help them) while refraining from taking the judging role and forgetting about all the injustice and suffering that other wars have caused (including on that very same piece of land that suddenly appeared on all newspapers' front pages on February 24th, 2022). I hope that these companies can serve as an example of positive action, humanity, and love.
0 0
04 Jun 2023 7:41am GMT
01 Apr 2023
Planet Maemo
Do not fall for the Synology Hardware SCAM
I recently needed some NAS and went with the "Synology RS1221+" barebone system. The system is competitively priced when compared to the similar "QNAP TS-873AeU-4G".
Synology HDD
For storage, the sweet spot between price and capacity was at 18TB. Lets look at some options:
| Toshiba MG09ACA 18TB | 270€ |
| Seagate Exos X X18 | 280€ |
| Synology HAT5310-18T | 700€ |
Depending on the benchmark sometimes the Toshiba comes out on top and sometimes the Seagate. Both are similarly priced, so thats fine.
However, talking of the price the Synology HDD stands out by asking a 150% premium.
You might now wonder whether you also get a better performance or other features in return. Well.. guess which is the only 18TB HDD that is verified by Synology for the RS1221+?
The scammy part here however is that the HAT5300 series are just rebranded Toshiba Drives with a different firmware. So the HAT5310 likely is just the MG09ACA and the main difference is the profit margin.
Note that different firmware does not result in any noticeable difference in performance.
I went with the unverified Seagate drives and - as one might expect - there are zero issues with doing so.
Synology RAM
At this point you might say, well Synology just did not get to test more 18TB drives.
Well.. I found the 4GB RAM rather tight and wanted to upgrade to 32GB as RAM is currently quite cheap anyway.
The options here are
| Kingston KSM26SED8/16HD | 50€ |
| Synology D4ECSO-2666-16G | 350€ |
I think there appears to be a pattern here. Again, both options have the same specs i.e. DDR4 2666, ECC SO-DIMM. Maybe Synology even rebranded the Kingston modules too, but I did not verify this.
While the DiskManager did not complain about the Seagate HDD, there is a warning when going with Kingston now. I guess this is because it matters even less.
To conclude this, I first want to emphasizes that both the Synology NAS Hardware and their DiskManager software work great with non Synology Hardware - just as one would expect of a standard x86 platform.
It is just a pity that they try to FUD you into buying their overpriced HDD and RAM.
Basically this is the same game as with printer vendors predicting ravages and annihilation when using 3rd party ink.
0 0
01 Apr 2023 1:03pm GMT
15 Feb 2023
Planet Maemo
The Maemulator: Running a certain 2009 tech demo on modern Linux
Want to revisit 2009's N900 tech demo but you got rid of your old toys long ago or don't want to bother digging them out of your desk drawer? The Maemulator to the rescue! It uses QEMU user-space emulation and some LD_PRELOAD magic + other in-process trickery to get it working on any modern Linux machine that has an OpenGL driver. Add multi-sample anti-aliasing, anisotropic filtering, higher resolutions, keyboard input and various fixes, and you are all set for a few minutes of fun distraction.

0 0
15 Feb 2023 10:55pm GMT
09 Feb 2023
Planet Maemo
Cara Download Judi online Apk Di iPhone
Judi online adalah salah satu agen taruhan judi online yang menyediakan berbagai permainan judi online yang dilengkapi dengan server terbaik dan juga tingkat keamanan yang baik sehingga data setiap member dapat terjamin keamanannya.
Judi online memberikan kenyamanan dan juga keamanan bagi setiap member agar dapat bermain dan bertaruh dengan nyaman. Selain itu juga menawarkan banyak promo yang bisa didapatkan dengan mengikuti syarat dan juga ketentuan yang ditetapkan.
Situs menawarkan berbagai game judi online untuk memberikan pengalaman terbaik bagi setiap membernya yang dapat dimainkan dengan satu akun saja. Selain itu, memberikan fasilitas dengan performa yang responsive, stabil dan modern sehingga memberikan pengalaman menakjubkan yang seru dan menyenangkan.
Sebagai situs penyedia game judi online terbaik dengan kualitas terbaik, juga memberikan kemudahan proses transaksi deposit maupun withdraw dengan mudah dan juga cepat. Judi online juga menyediakan layanan bantuan yang bisa diakses dalam 24 jam penuh. Daftar sekarang dengan cara kunjungi situs resmi.
Cara Download Judi online Apk Di iPhone
Sebagai situs penyedia game judi online terbaik dan terpercaya, Judi online menawarkan pelayanan terbaik dengan menghadirkan program aplikasi berbasis Android dan juga iPhone. Untuk mendapatkan program Apk di iPhone, kamu dapat download secara langsung Apk dari pada link ini atau pada menu Download Apk. Pastikan kamu telah login terlebih dahulu untuk dapat download Judi online Apk di iPhone.
Download sekarang dan rasakan kecepatan server terbaik dengan bermain di Apk pada perangkat smartphone iPhone. Salah satu ketentuan untuk dapat bergabung dan bermain di Judi online adalah telah berumum 18+, menggunakan data yang valid dan dapat menjaga kerahasiaan akun.
- Siapkan smartphone iPhone - pertama pastinya Anda diharuskan untuk menyiapkan perangkat berbasis iPhone terlebih dahulu untuk bisa melakukan proses download. Smartphone berbasis iPhone adalah salah satu yang selama ini banyak digunakan karena memang dianggap lebih mudah dan praktis.
- Kunjungi situs resmi Judi online- anda juga harus bisa mengetahui situs resmi dari situs tersebut. Anda bisa mengunjungi situs utama ataupun juga situs alternatif yang tersedia. Dengan cara begitu nanti aksesnya juga pasti akan lebih mudah dan juga praktis.
- Cari link download yang tersedia - ada beberapa pilihan yang download yang kemudian tersedia dan anda bisa coba memilih salah satunya saja. Link download yang Anda pilih pastinya adalah link download for iPhone Bukan for Android.
- Klik tombol download - selanjutnya Anda tinggal klik tombol tersebut untuk memulai proses download. Prosesnya sendiri tidak perlu memakan waktu lama dan biasanya hanya sebentar saja.
Judi online adalah agen judi online yang menghadirkan berbagai jenis game judi online terlengkap dan juga terpercaya. Ini juga telah memiliki lisensi resmi dari PAGCOR (Philippine Amusement And Gaming Corporation) sejak tahun 2017. Anda bisa coba gabung di situ jadi yang satu ini karena memang terpercaya dan bisa dianggap sebagai pilihan tempat bermain yang aman dan nyaman. Bahkan juga situs ini jadi salah satu pilihan yang direkomendasikan dan banyak pemain profesional yang selama ini sudah berpengalaman dan sering bermain permainan taruhan judi bisa.
Dengan download Judi online Apk di iPhone, maka bermain taruhan online lebih mudah untuk dimainkan dengan mudah dan juga cepat. Banyak keunggulan dan keuntungan yang dimiliki dan ditawarkan sehingga sangat layak memainkan taruhan judi di situs tersebut.
The post Cara Download Judi online Apk Di iPhone appeared first on VALERIOVALERIO.
0 1
09 Feb 2023 11:06am GMT